

I’ve had several attempts at making bacon bowls/baskets lately, and several fails, but I learned a fair bit along the way about bacon shrinkage and slippage and stickage (stickage?). I also did a fair bit of online research about different ways to make bacon bowls, and general research about cooking bacon. I combined all my acquired knowledge and finally got something to work, hurrah! If you do an online search for bacon bowls, or bacon baskets, you will find simpler ways to make them than mine, but what can I tell you? The simple versions didn’t work for me, so I give you my version, which combines elements of lots of other versions – Maple Bacon Baskets…
WHAT YOU NEED:
– 5 slices of bacon per basket (UK people – you really need streaky bacon for this).
– White flour
– Maple syrup
– Non stick cooking spray
– One empty beer can (or other tall empty can) per basket
– Foil
– String
WHAT YOU DO:
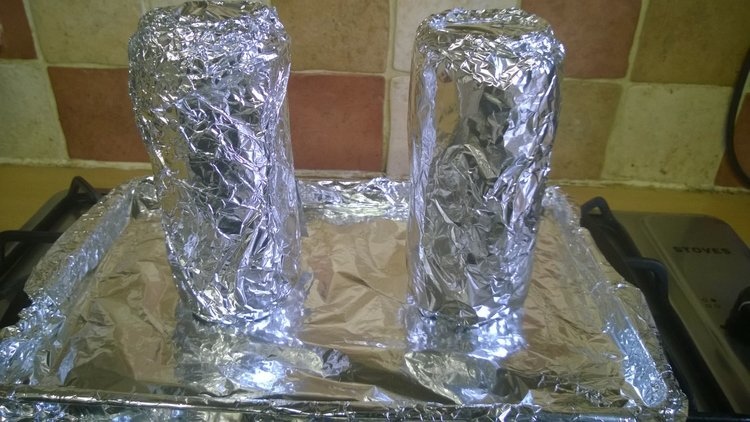
1. Cover the cans with foil. Place onto a tin, foil-lined if you want easy clean-up.
2. Lightly coat the bacon slices in flour.

3. Spray the non-stick cooking spray over the cans, and then drape three slices over the top of each can, like this:

4. Take the fourth slice of bacon and weave it around the side, over and under the draped slices, and then do the same with the fifth slice, alternating the over/under. It should finish up something like this:

5. Cut a wide strip of foil, spray it with non-stick cooking spray, wrap it around the bacon and tie firmly with two pieces of string, where you think the sideways slices of bacon are sitting. Like this:
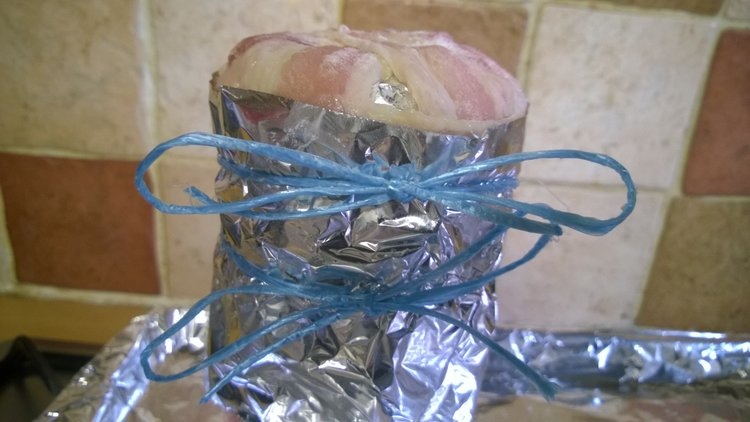
Most of the versions I found online didn’t involve any covering or tying, but they just came apart during the cooking for me. Maybe I’m just using the wrong type of bacon!
6. Place in the oven 160C/320F for about 30 mins until the exposed bacon on top is starting to get a good colour.
7. Remove the string and outer layer of foil. Do this carefully, even with the non-stick spray, it may have stuck a little.
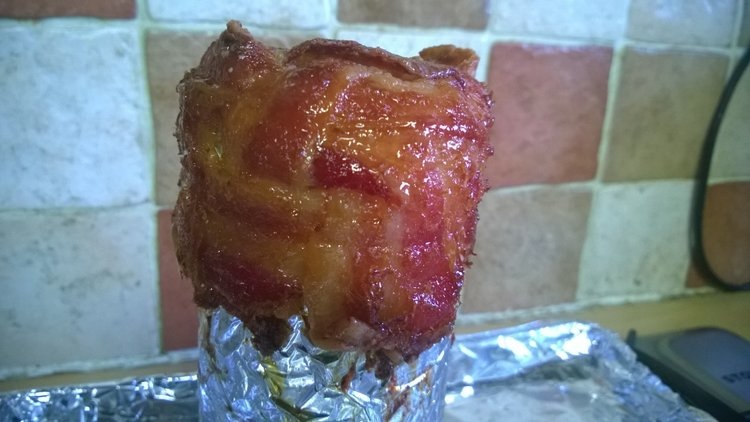
8. Brush the whole bacon basket liberally with maple syrup, then place back in the oven for about 10/15 minutes, checking regularly until desired colour and crispness is achieved.
9. Leave to slightly cool as is for a couple of minutes and then very carefully remove the basket from the can. This is a stage where I’ve had breakages. I suggest sliding a knife up and down around the inside edge to loosen it. If you didn’t use the non-stick spray then you really will be struggling here.
10. Allow to cool on a rack.
These baskets make a nice way to serve a side salad or starter if you have guests for dinner, or instead of salad, use them for breakfast filled with scrambled eggs. I’m sure you can think of other things you could fill them with too – potato salad? Mini pancakes and more maple syrup? Maybe even a fruit salad? Any other ideas?

Well, this is something I would never in my life make, but it’s fascinating and there must be somebody out there who wants to do it, so I’m going to share it on Facebook. 😀
LikeLike
Yes, it’s not something I’m going to be making very often, but it became kind of a mission after I tried making it once and it failed! Thanks for sharing it 🙂
LikeLike
Well, this is something I would never in my life make, but it’s fascinating and there must be somebody out there who wants to do it, so I’m going to share it on Facebook. 😀 (Huh – comment didn’t take the first time.)
LikeLike
Yeah, you said 😉
LikeLike
Now, the first comment wasn’t there, I swear!
LikeLike
I’ve had that happen before when I was commenting on someone’s blog! Just a delay in the system I guess.
LikeLike
Wow, epic!
LikeLike
Well it was an epic journey of failures till I got here! These don’t quite fit with the healthy theme of your blog, well the salad’s ok, ha!
LikeLike
Ingenious. An excellent presentation for all the contents you mentioned and something I would like to try. However, all that bacon would give me my heart an attack. 😀 😀
LikeLike
Yeah, no amount of salad can disguise the fact that there’s lots of unhealthy bacon there! It was very satisfying though when they finally worked after several times of them coming apart and breaking!
LikeLike
I could do it just to challenge myself and invite guests when I knew I’d mastered the technique. I’d have to choose really YOUNG people who may not be bothered by all that…you know…makings of a heart attack. I want to blow their minds with my talents first. Ha ha.
LikeLike
What an accomplishment! I think I’d like to try it for a fancy little brunch sometime. Thanks for going through all the trial and error for me!
LikeLike
That’s ok! Although as I said, others seemed to have more success with simpler methods, so maybe it’s just me! I’m thinking that it might be much easier with dry-cured bacon though because you get a lot less shrinkage with that.
LikeLike
Pretty impressive!, … and pretty too!
LikeLike
Thank you! And what do you think of the bacon baskets? 😉
LikeLike