

Honeycomb is one of the quickest and easiest candies/sweets to make, but it is a scientific process, and you have to get it right for it to work. If you search online you will find several variations of the honeycomb recipe (also sometimes called sponge candy, cinder toffee, bonfire candy and more). This is the version I like, which comes from the guardian website:
WHAT YOU NEED
– 100g caster/superfine sugar
– 3 tablespoons of golden syrup
– 1 teaspoon of bicarbonate of soda/baking soda
– Greaseproof paper and a little butter for greasing it
– Dark or milk chocolate for dipping (optional, and apologies, I forgot to note how much chocolate I used because I made a few batches of the honeycomb, but I’m sure you can judge it by eye).
You’ll also need a candy/kitchen thermometer
WHAT YOU DO
l. Prepare a baking sheet or tray with greaseproof paper that you have lightly greased with butter.
2. Place the sugar and golden syrup in a heavy-based pan (make sure it is a pan with lots of room above for it to expand), and gently warm it, stirring continuously with a wooden spoon until the sugar is dissolved.
3. Remove the spoon, insert the candy thermometer and heat to 150C/300F.
4. Now you need to work quickly. Remove from heat, add the bicarb right away and stir briskly just long enough until it is fully incorporated, it will bubble up and foam. Quickly pour it onto your prepared sheet/tin and spread out. Don’t play with it too much, it doesn’t need to be pretty.
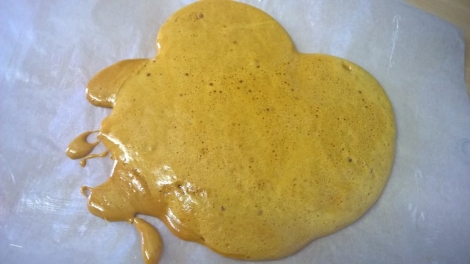
5. Leave it at room temperature to set, and then roughly break it into pieces – I hold it through the greaseproof paper to break it up so as to avoid the heat of my hands touching it more than is necessary. Don’t try to make the pieces even in size and shape, you’ll fail, just let it break as it wants.

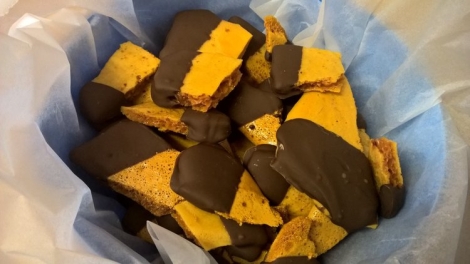
6. You can leave it like this, or melt chocolate and half dip the pieces, then let them dry on greaseproof paper (allow the chocolate to cool a little before dipping). Either way, once set, place pieces into an airtight container, and keep at room temperature.
A few points to note:
- In theory, this should be something nice to wrap in cellophane bags and give as gifts, but unfortunately by the next day it will have started to go sticky and the pieces will clump together. It is however ideal to take to someone’s house as a contribution to food that is going to be eaten that day. If you do want to give it as a gift that won’t be eaten right away, then I would suggest fully encasing the pieces in chocolate, rather than just half-coating, and I would definitely temper * the chocolate first to get a glossy, more durable coating.
- You might get slightly different results depending on your ingredients and cooking conditions, so if the honeycomb has a slight burnt taste to it, then make another batch and take it to a slightly lower temperature before removing from heat. Equally if it is too pale and doesn’t set to crisp, then take it slightly higher next time. Experiment a bit, it’s very quick to make, and once you get it right then stick exactly to that each time.
- Once you’ve perfected the recipe for yourself, don’t imagine that you can double the quantities and get the same results. You would think when it was taken to a set temperature you could, but when I made a double size batch (twice because I didn’t believe it the first time), it didn’t go to the golden caramel colour, it stayed pale and set to chewy rather than crispy. So better to make several batches if you want more.
- The reason for quickly spreading it out thinly after adding the bicarb is that it will continue to cook, so it has to be cooled quickly. If you tried to pour it into something more contained to get a block, it will likely overcook and taste burnt.
- The bits of mixture will quickly turn very hard on your pan and any implements, but don’t worry, it is water soluble, so just put it to soak in hot water and it’ll come off without too much difficulty.
* To temper chocolate (from the guardian) –
Chop your chocolate evenly and put about two-thirds of it in a heatproof bowl. Heat 5cm (2in) water in a pan and pop the bowl on top of the pan, making sure that the bottom of the bowl is not touching the water. Allow the chocolate to melt slowly. Once it’s completely liquid, turn off the heat, remove the bowl from the pan and wrap a clean tea towel round the base to keep it warm. Add the remaining chopped chocolate, pop the thermometer in and stir the chocolate until it reaches 31–32C (88–90F) for dark chocolate, 30–31C (86–88F) for milk chocolate and 27–28C (80–82F) for white chocolate. This will take a while. Once done, it’s ready to use.
Honeycomb is pretty much pure sugar, so definitely only for an occasional treat!

Way too touchy for me to ever try! I’ll bet it wouldn’t work well at high altitude (we’re about 6000 ft.) And I would always encase it all in chocolate! I’m all for chocolate!
LikeLiked by 1 person
Ah yes the high altitude, I guess that would affect it. I keep wanting to try making divinity that you told me a long time ago but I know that doesn’t work well if the air is humid, so I need to remember on a day when our humidity is low!
LikeLiked by 1 person
This looks so yummy. And just after all those Christmas treats I ate. Uh-oh…
Hope you had a nice Christmas, Vanessa. 🙂
LikeLike
What do you mean “AFTER all those Christmas treats”, it’s still “during” for us with the Christmas treats! I actually made this honeycomb several days before Christmas to take to a friend’s where we were going for a festive lunch, and I meant to post it on here before Christmas, but time got away from me! Yes thank you, hope you’ve been having a good Christmas too 🙂
LikeLike
Well, if we’re being honest, I must confess I’m still indulging a bit…
LikeLike
I don’t want to advertise, but I do love a Cru***ie. I might have to make some of these. Later in the year when I’ve lost all the weight I gained in 2015 🙂
LikeLike
Well honeycomb is really mostly air right?
LikeLike